Farm Cake - Part One
Settling in and (still) unpacking after a busy weekend back in my home state visiting family for Easter. To any of my readers who celebrated, I hope you had a wonderful day and were able to enjoy some quality time with your loved ones! It'd been over a month since we'd been home (when I made this cake), so it was great to spend time with our families. It was especially exciting to spend time with my young niece and nephew, they were very excited about the Easter bunny!
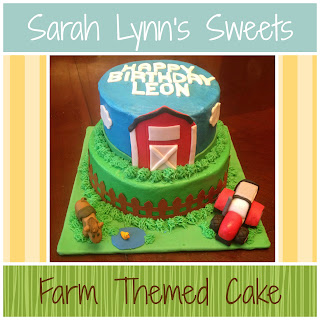
I really wanted the cake to be special, as this was his 60th birthday. So I started worrying about how I was going to make a horse and tractor that wasn't too kiddie looking. I've done some fondant characters, flowers, and cartoon-like animals, but nothing as complicated as a tractor or horse. I decided to look around on Pinterest for farm cakes for adults. I'd seen some adorable ones for kids, but again I didn't want it too juvenile. That's when I saw and pinned this cake from For the Love of Cake. I didn't use the exact design, but definitely took inspiration from the cake. Later after looking around more, I saw quite a few cakes with the blue and green layers, clouds, grass, and a similar looking barn. It is definitely utilized in a lot of farm themed cakes, but I wanted to give credit for where I got the idea originally.
Basic vision of the cake
Once I had narrowed down the theme and basic design, I started working on the three main components - the horse, barn, and tractor. Today's post will bring you my tutorials and directions for creating these three components. Check back in the next day or two for Part Two which will be about putting the whole cake together.
Now, I'll admit that I do not have the best tutorials for these components, they were challenging to make! I started taking pictures at each step, but then things got complicated. I basically did a trial and error method to getting the tractor and horse complete. There were many times when I thought I would never get it looking right. The horse, especially, looked like a cow most of the time. When I first got something that looked like a horse, I realized it was twice the size as the tractor, not exactly to scale! Finally I created a tractor and horse that, while far from perfect, were presentable! Here is a basic outline of how I made each component.
The Barn
- Roll out red fondant to around 1/8 in thick and cut into pentagon shape
- Press metal spatula down into barn every 1/4 in or so to make it look like planks of siding
- Roll out black fondant to 1/16 inch thick and cut out thin strips
- Attach black strips to the top of the red barn and shape to resemble roof sections (attach with gum glue - small balls of fondant dissolved in water)
- Cut out two white rectangles of fondant (1/16 in thick), one should half the size of the other
- Attach the larger rectangle as the door, and the smaller one horizontally as the window
- Cut two white strips to attach to the side of the barn
- Cut two white strips to make an "X" shape on the barn door
- Attach these strips with gum glue
- Place around 6 in cake pan to make the shape it will be on cake, let it dry laying inside cake pan to keep that shape
- Start with black fondant rolled out to around 1/4 in thick
- Shape the fondant to the tractor base - a square with a thinner rectangular shape coming out of the middle
- Dye a chunk of fondant red and creating a rounded rectangular shape, which is the rounded front section of the tractor
- Create a large, rectangular shape of white fondant to serve as the cab of the tractor
- Attach the white cab and red front to the black base
- Create two large balls of black fondant to serve as back tires, and flatten them out
- Attach these to the tractor base with gum glue
- Create indentations into tire using the side of the spatula to create treads
- Repeat process for the smaller front tires
- Cut out red rectangles and attach to top of the back tires
- Add additional details such as gray hub caps (with black center) and the top of the tractor
- Finish up with thin black fondant ropes to create the frame of the cab
The Horse
So after a LOT of trial and error, I've come to a few conclusions:
- Don't try to do individual legs on the horse when making it this small, it isn't stable enough. I did one wide piece on front and one on back and used spatula to make indentation between the "legs"
- Don't try to attach neck and head - do the whole body all in one piece
So here's how I actually did it:
- Start by dyeing a chunk of fondant light brown
- Shape into the basic horse shape with a rectangle shaped body, legs, and a neck/head
- Start smoothing out the fondant and carving it to make it resemble a horse
- Shape two small triangles of the light brown fondant and attach as ears (using gum glue)
- Once the shape resembles a horse, dye leftover fondant darker
- Roll dark fondant out to 1/16 in
- Cut out small strip of fondant and shape into mane
- Attach mane with gum glue
- Create two small balls of black fondant to serve as eyes, attach with gum glue
- Using a toothpick, create holes for horse nose
- Finish up horse, by creating small tail with the darker fondant and attach with gum glue
- You can also use an even darker brown fondant and create a rectangular shape to serve as saddle, if desired

Check back for my post about putting the whole cake together! I'm attempting to participate in an April blogging challenge where the push is to blog everyday. Now, I'm not sure I will post EVERY day this month (that's a ton for you to read). But, I am trying for 4-5 times a week. That's still a LOT of recipes, though, so I'm thinking of some other types of creative posts that still have a baking/cake decor theme. I was thinking about a "Peek in my Pantry" post about my favorite brands and ingredients, and maybe a "Tools of the Trade" post detailing my favorite cake decorating tools. Possibly even a Fondant 101 or Baking 101 with tips and tricks I have learned.
I'd LOVE to hear from you, the reader! Any questions you would like to see answered (in regards to baking/cake decorating)? Or is there a technique or product I've used that you would like to see explained in more detail? Please leave a comment with your ideas and suggestions, if you'd like! Or you can write me on my Facebook page. Thanks for your input!


