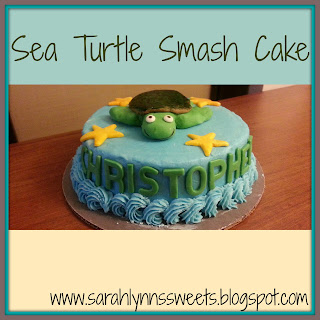
Sea Turtle Smash Cake
Today's Monday tutorial is for a cute smash cake perfect for your favorite sea turtle fan. You may have heard me talk about my sea turtle smash cake in previous posts, or may have seen the picture on Facebook or Instagram. This turtle cake was for Christopher, the little boy of a good friend of mine from college. I was excited that the timing of the party worked out that we were able to go, I hadn't seen her or some of our other friends in almost a year.
Christopher loves the movie, Turtle Tale, so my friend put together an adorable sea turtle and ocean themed party. She is an extremely artistic and creative person, and the party decor was no exception. She made a turtle cupcakes and cake and ocean decor, you could tell a lot of love and hard work was put into this party! Here's a pic I took of the food table, so much tasty (and adorable) food! Notice even the cookies fit the color palette of the party!
No matter how many cakes I make, I always get really nervous when I show them to my friends/family/customers. Thankfully, they loved the cake - especially Christopher. He immediately picked up the fondant turtle and started eating its legs off! By the end of the party, it was just a shell with some green underneath. We had a great time at the party reminiscing and celebrating this special boy!
To start the cake, I first made a turtle several days before the party. Here's the steps I used:
- Start by dyeing fondant green
- Roll out to around 1/4 inch (it doesn't have to be perfectly flat)
- Use a spatula to start cutting out the basic shape of the turtle (head, four legs and tail)
- Put a little Crisco on your fingers and smooth out the edges of the turtle, you can shape it more with a spatula if needed. (I realized sea turtles front legs usually point back toward the legs, so I bent them back.)
- Roll out brown fondant to around 1/8 inch
- Cut out a circle of the brown fondant the size of the shell (doesn't have to be perfectly round)
- Draw hexagon/triangle/square shapes on the brown shell using a black edible marker (these don't have to be exact, in fact random shapes appears more natural)
- Attach the shell to the turtle using gum glue (pieces of fondant dissolved in water)
- Attach two small dots of white fondant on the head for eyes
- Add black dot to each eye and a mouth with black edible marker
- After looking more at the Turtle Tale pictures, I realized it was more of a dark green shell than brown. I used a paint brush and painted on a small amount of green Wilton food gel. This not only made it appear more green, but also gave it more of a textured look.
Creating the turtle is really the bulk of the work for this cake, but here is how I finished it up!
- Bake and cool a 6 inch cake and place on 8 in cake board
- Cover the cake with blue buttercream and smooth out
- Dye fondant an orange-yellow color and roll out to 1/16 inch
- Cut out star shape using cutter or Exacto knife
- Place turtle and starfish on using a dab of water, if needed
- Roll green fondant out to 1/16 inch and cut out child's name and place on front of cake
- Use any star tip (#16-#22, #32, etc) to create a shell border to represent waves
- Fill pastry bag with star tip and blue icing
- Start piping at base of cake and move upward and right in a circular motion
- Continue piping pattern all around cake
Make sure and check back this week - I'm sharing Derby inspired cupcakes on Wednesday and a delicious savory post on Friday. Next Monday's tutorial post will be about the butterfly cupcakes I mentioned in an earlier post. Don't forget to follow me Facebook or Twitter for updates on new posts. I also share my creations on Instagram, usually before sharing on the blog.


