Black, White, and Pink All Over - Part 2
Today's post tackles two more components. I'm providing a tutorial for the large fondant cake topper. This bow needs to be started at least a week before using. The post also shows the zebra print and pink snack that will be served. It's a yummy blend of sweet and salty, and perfect for the party theme.
Let's start with the fondant bow. Here's step by step instructions on how to make the topper:
- Mix together a 2 in diameter ball of black fondant and a 1 in diameter ball of gum paste. You usually can't find colored gum paste, so I just used white. If used in a smaller amount, it doesn't drastically change the color of the fondant. Usually I use a 50/50 mix of fondant and gum paste for the bow. But to keep the black tint, I decided to only use 1/3 gum paste and 2/3 fondant.
- Pinch off a chunk of the mixture, and cover the rest until needed.
- Roll the mixture out to 1/8 in.
- Using the Wilton fondant roller, or an Exacto knife, cut strips of fondant 3/4 in wide and around 5 1/2 inches long. You can make some slightly longer, some slightly shorter.
- Cut off the corners of the strip.
- Apply gum glue (balls of gum paste in water) to the ends of the strips.
- Wrap the strips around a rod that's around 3/4 in - 1 in diameter. Long wooden dowel rods from Michaels make a perfect tool to use.
- Continue the steps until you make around 14 or so strips. Only 11 are needed for the bow, but it is best to have some extras.
- Let dry for at least 48-72 hours, keep away from moisture and excessive light.
- Roll black fondant to 1/16 in.
- Using the Wilton round cutters, cut out a circle in small, medium, and large.
- Cover the large circle, and bottom of six loops, with gum glue.
- Press six loops onto the large circle.
- Cover the bottom of the medium circle with gum glue and press onto the row of loops.
- Apply gum glue to the top of the medium fondant circle.
- Repeat the process by placing four loops on the medium circle.
- Cover the bottom of the small circle with gum glue and place on the four loops.
- Apply gum glue on top of the small circle.
- Press the last loop standing up in the middle of the bow. If it won't stand up straight, you can add paper towels in to help it dry in the upward position.
- Let dry for a few hours and lightly tap the bow. If any of the loops are loose, stick fresh fondant onto the loop along with gum glue. Place it back into position and hold in place for a few seconds.
- Let the bow dry for at least 48-72 hours. Be careful when moving the bow, as it can be brittle.
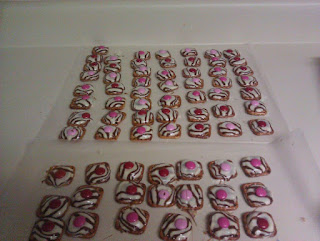
The other tutorial today is the zebra print and pink sweet and salty treats! These are basically snack size chocolate covered pretzels that are VERY easy to make. Using pink M&M's available around Valentine's Day, they are perfect for our party theme. You can make around 70 on one cookie sheet and they take less than 10 mins to cook and assemble. The longest part is unwrapping all those Hershey Hugs, that's usually my husband's job!
I originally found these on Pinterest through a blog, G*Rated.
- Package of pink Valentine's Day M&M's
- Bag of waffle shape pretzels
- Bag of Hershey's Hugs
- Parchment paper
Zebra and Pink Pretzel Snack Directions
- Preheat oven to 170 F
- Line cookie sheet with parchment paper
- Unwrap Hershey Hugs
- Line waffle pretzel up on cookie sheet
- Place Hershey Hugs on top of pretzels
- Bake for 4-6 minutes, you want the Hugs to be melting, but not have lost their basic shape.
- While warm, place the pink M&M's (logo side down) onto Hugs and press down lightly.
- Let cool and serve!
Hope you enjoyed the second installment of Zebra Print and Pink! Don't forget to check back next week to see how it all comes together! I'll post some pics on my Facebook page the day of the party, and then post a blog sometime next week.


