Lions, Tigers, and Soccer Balls - Oh my!
I had a lot of fun with my latest project. I hadn't done much with fondant or gum paste until my Wilton class I started a couple weeks ago. I have learned so much! I never really knew much about the difference between the two. Gum paste is great for flowers and more intricate work, as it gets much harder than fondant when it dries. If stored properly, the pieces will last for years. I have really enjoyed working on the flowers we have learned in class. We haven't done much with fondant, so I have been experimenting on my own. Working with both takes me back to my play-doh days. :)
The more I learn and experiment, the more I look for reasons to bake and decorate special treats. Two of my favorite people to make treats for are my niece and nephew! It's fun watching them get so excited about the cupcakes. Especially my 2 year old nephew, as he gets very hyper afterward! I'm sure my sister loves that.. Anytime we are home on the weekends to visit, I always try to make a special treat for them. The other day my nephew was looking at a picture of a cake and excitedly ran up to me and said "NeeNee cake! You make cakes!" Who wouldn't want to spoil them?
Both my niece and nephew recently started playing Upward Soccer. My husband and I were able to come this weekend to watch the games. My niece is on the Lions team, and they did great! My nephew is in the preschool Tiger Cubs group. They didn't play a game, but it was fun watching him kick the ball around with my husband. I told them I had made special soccer treats and they got very excited! My niece even asked for them in the concession line, she was wanting them for lunch. I think the workers were a little confused as to what a "NeeNee's cupcake" was.
I decided to make my favorite vanilla cupcakes, but add a special twist for the decor. Since they are proud of their teams, I wanted to make some lions, tigers, and soccer balls for the cupcakes. Below I have some instructions on how to make each of the three fondant decorations.
Here is what you will need:
- Mat for working on (I used my new Pampered Chef mats as they were a great size and even had a ruler on the edge so I could figure out what size balls I was making)
- Crisco - cover the mat in a thin layer of crisco to keep fondant from sticking
- Wilton thick modeling stick (or any long cylinder with rounded end)
- Gum glue (instructions below)
- Food coloring (preferably gel type)
- Wilton edible color markers
- Toothpick
- Bag of white fondant (not pictured)
Gum Glue:
To attach pieces of fondant to more fondant, you will need to make some gum glue. This is created using gum paste. If you do not have gum paste to make this, then you could just use icing as an adhesive. If you do have gum paste, you just need to drop very small balls of it into a 1/4 cup of water. As the gum paste dissolves, it creates an adhesive. Just apply the water to the pieces you wish to adhere.
Soccer Ball instructions:
- Roll out a small ball of fondant, about the size of a ping pong ball. Make sure and roll it well to get all creases out.
- Using a black edible marker, draw a pentagon shape at the center of the ball with five lines coming out.
- The five lines coming out then become hexagons. Continue the pattern of black pentagons and white hexagons to create the soccer pattern, as shown in the figure below.
- I used this soccer ball by placing it on a cupcake covered with green icing, to look like grass. You can either spread the green icing on, or use the Wilton 252 tip to create a grass-like effect on the cupcake.
- For the lion, you will also need some brown icing, piping bag, and the Wilton tip 252 (more instructions below).
- Roll out a ball of white fondant, about the size of a ping pong ball.
- Add food coloring to the fondant. I used the Wilton food gel by adding equal parts of brown and copper. For this gel coloring, you just dip a toothpick in the gel and then insert it into the fondant.
- Knead and roll the fondant until the color works through, and you have an even tone. Warning - This will get lots of coloring on your hands. If you use food service gloves, make sure and coat with some corn starch to prevent sticking. The coloring does wash off well though, so I just used my hands.
- Break off a small, marble sized amount of fondant to serve as the ears.
- Take the larger piece of fondant and pinch and flatten it to get the lion head shape. You want the top of the head to be smaller than the base. See pics below.
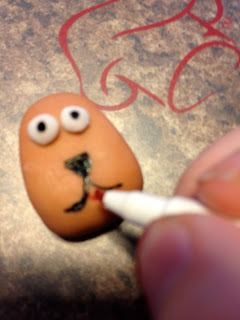
- Roll two small balls of white fondant for the eyes. Attach these using gum glue, or icing. Simply spread a small amount of either edible adhesive on back of eyes, and attach to fondant.
- Using an edible black food marker, place dots in the center of each eye.
- Using the marker, draw a nose and lines for the mouth. Add a red touch for the tongue.
- Roll a small amount of the fondant to create ears. Flatten it using a rounded tool, as shown below. This creates the hole for the ear.
- After creating both ears, attach with gum glue.
- For the mane, it's best to place the lion on something to raise it up. I started doing it flat and had trouble, especially under the ears. For the second lion, I actually placed some hardened fondant underneath.
- Prep a piping bag with the Wilton tip 252 (grass tip). Fill the bag with brown icing. I just used some decorators icing from a can and added the brown food coloring. You can use canned icing or buttercream, you just want to try for a thicker icing, so the mane will hold its shape. If your icing seems runny, you can refrigerate it to stiffen it up some.
- Apply pressure and pipe a small amount at the edge of the face. Slowly release the pressure as you pull the bag away from the lion. Sometimes the first part has trouble sticking, you may need to put a dab of icing on the lion for it to stick to. But as you go, the icing starts sticking to the icing already there.
- Repeat this process all around the lion.
- I let the lion sit for at least 24 hours to let the icing harden. It was still very brittle, so be careful if transporting. I finished the lion by placing it on some piped icing on a cupcake.
- Roll out a ping pong ball size of fondant. I had some extra fondant left from the lion, so I just added red and golden yellow to it. If using white, I would try to add some brown and then equal parts red and golden yellow.
- Pinch off a small amount (marble sized) for the ears.
- Roll the larger portion into a ball and then flatten out with your finger. You want it to have a round shape, just flattened some.
- Follow the same process as the lion to create and attach eyes.
- Roll out a small amount of white fondant to create the mouth/nose area of the tiger. I flattened it to make a small pancake shape. I then used the Wilton modeling tool (you can use any cylinder shaped object) to shape the indentation for the mouth portion. See pics below for the shape.
- Using the edible marker, add details to the eyes, nose, and whiskers.
- Next I added stripes for the face with the edible marker.
- Using the fondant for the ears, make small triangle ears and attach with edible adhesive (gum glue or icing).
- Add details to the ears using the edible marker.
- This one is much more sturdy than the lion, but I would still let it sit to dry for at least 4 hours.
- I finished the tiger by placing it on some piped icing on a cupcake.
If you haven't, check out my page on Facebook, linked below. I share additional photos and ideas from other sites on that page as well. Feel free to share your comments or ideas! I have some other projects coming up (including my husband's birthday cake) that I will be posting about soon!
Sarah Lynn's Sweets facebook page


